Tweet
Tweet
- Mô tả:
- Học viên thực hiện kết nối đến Sandbox SD-WAN (vManage), viết code để lấy danh sách thông tin các thiết bị bằng ngôn ngữ Python.
- Máy PC phải đáp ứng yêu cầu đã cài đặt trạm làm việc cho developer.
- Yêu cầu kĩ thuật:
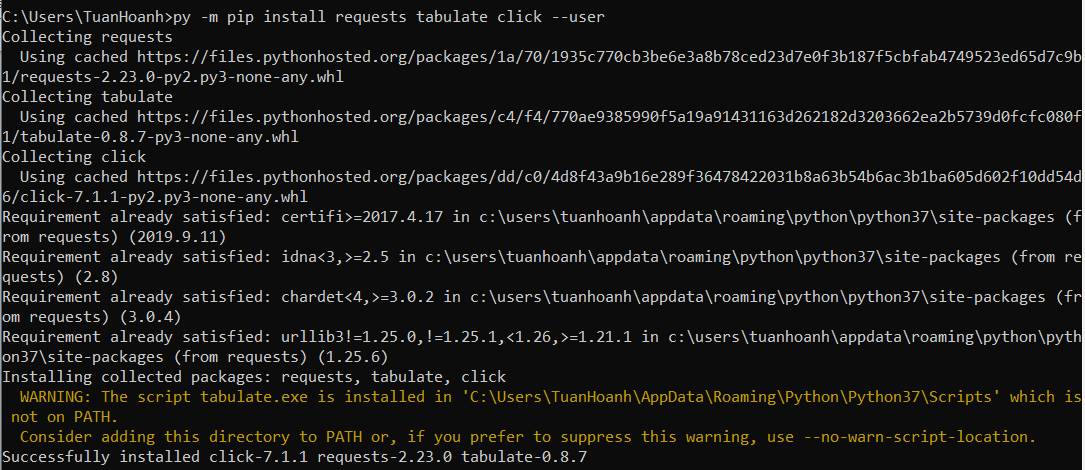
- Cài đặt thư viện requests, tabulate, click trên máy tính.
- Kết nối đến Sandbox SD-WAN (https://sandboxsdwan.cisco.com:8443/)
- Viết code bằng Python thực hiện yêu cầu:
- Đăng nhập và xác thực
- GET requests, POST requests
- Lấy danh sách thông tin các thiết bị trong Controller
- Các bước thực hiện:
- Bấm tổ hợp phím Win+R để chạy cmd
- Trong màn hình cmd gõ : python –m pip install requests tabulate click –user
Bước 2: Viết code đăng nhập và xác thực
Import các thư viện cần thiết và tắt cảnh báo
Code:
[INDENT][FONT=Times New Roman][SIZE=14px]import requests[/SIZE][/FONT]
[FONT=Times New Roman][SIZE=14px]import sys[/SIZE][/FONT]  [SIZE=14px][FONT=Times New Roman]import json
import click
from tabulate import tabulate
import SD_WAN_INFO

requests.packages.urllib3.disable_warnings()[/FONT][/SIZE][/INDENT]
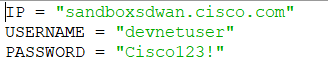
Trở về file trước, ta khai báo các thông tin của Sandbox SD-WAN, các biến SDWAN_IP,USERNAME,PASSWORD sẽ lấy giá trị từ file SD_WAN.py đã tạo ở trên.
Code:
[INDENT][SIZE=14px][FONT=Times New Roman]SDWAN_IP = SD_WAN_INFO.IP
SDWAN_USERNAME = SD_WAN_INFO.USERNAME
SDWAN_PASSWORD = SD_WAN_INFO.PASSWORD[/FONT][/SIZE][/INDENT]
Code:
[INDENT][SIZE=14px][FONT=Times New Roman]class rest_api_lib:[/FONT][/SIZE][/INDENT]
Code:
[INDENT=2][SIZE=14px][FONT=Times New Roman]def __init__(self, vmanage_ip, username, password):[/FONT][/SIZE][/INDENT][INDENT=3][SIZE=14px][FONT=Times New Roman]self.vmanage_ip = vmanage_ip[/FONT][/SIZE][/INDENT][INDENT=3][SIZE=14px][FONT=Times New Roman]self.session = {}[/FONT][/SIZE][/INDENT][INDENT=3][SIZE=14px][FONT=Times New Roman]self.login(self.vmanage_ip, username, password)[/FONT][/SIZE][/INDENT]
Code:
[INDENT=2][SIZE=14px][FONT=Times New Roman]def login(self, vmanage_ip, username, password):[/FONT][/SIZE][/INDENT][INDENT=3][SIZE=14px][FONT=Times New Roman]"""Login to vmanage"""
base_url_str = 'https://%s:8443/'%vmanage_ip
login_action = '/j_security_check'
login_url = base_url_str + login_action[/FONT][/SIZE][/INDENT]
Code:
[INDENT=3][SIZE=14px][FONT=Times New Roman]login_data = {'j_username' : username, 'j_password' : password}[/FONT][/SIZE][/INDENT]
Code:
[INDENT=3][SIZE=14px][FONT=Times New Roman]sess = requests.session()
login_response = sess.post(url=login_url, data=login_data, verify=False)[/FONT][/SIZE][/INDENT]
Code:
[INDENT=3][SIZE=14px][FONT=Times New Roman]if b'<html>' in login_response.content:
print ("Login Failed")
#print(login_response.content)
sys.exit(0)[/FONT][/SIZE][/INDENT]
Code:
[INDENT=3][SIZE=14px][FONT=Times New Roman]self.session[vmanage_ip] = sess[/FONT][/SIZE][/INDENT]
Định nghĩa phương thức get_request, trong đây chúng ta sẽ phải tạo một url mới, tham số api truyền vào tùy mục đích sử dụng nên chúng ta sẽ dùng %s để url có thể thay đổi dễ dàng. Ta sẽ dùng tiếp session vừa được xác thực thành công để gọi các API tiếp theo mà không cần phải gửi kèm theo username, password; get để gửi yêu cầu lên server và nhận lời đáp lại, sau đó gắn thông tin từ lời đáp lại vào biến response. Để lấy dữ liệu, ta sẽ dùng response.content gắn vào biến data và đây cũng là giá trị trả về của phương thức get_request này.
Code:
[INDENT=2][SIZE=14px][FONT=Times New Roman]def get_request(self, api):[/FONT][/SIZE][/INDENT][INDENT=3][SIZE=14px][FONT=Times New Roman]url = "https://%s:8443/dataservice/%s"%(self.vmanage_ip, api)

response = self.session[self.vmanage_ip].get(url, verify=False)
data = response.content
return data[/FONT][/SIZE][/INDENT]
Phương thức post_request này tương tự với phương thức get_request ở trên nhưng khác ở chỗ post dùng để gửi yêu cầu tạo tài nguyên mới trên server. Và có thêm tham số đầu vào là payload và headers. Payload là nơi sẽ chứa đựng các thông tin gửi kèm theo khi gửi yêu cầu post. Headers khai báo kiểu nội dung là application/json.
Code:
[INDENT=2][SIZE=14px][FONT=Times New Roman]def post_request(self, api, payload, headers={'Content-Type': 'application/json'}):[/FONT][/SIZE][/INDENT][INDENT=3][SIZE=14px][FONT=Times New Roman]url = "https://%s:8443/dataservice/%s"%(self.vmanage_ip, api)
payload = json.dumps(payload)
print(payload)[/FONT][/SIZE]
 [/INDENT][INDENT=3][SIZE=14px][FONT=Times New Roman]response = self.session[self.vmanage_ip].post(url=url, data=payload, headers=headers, verify=False)
data = response.json()
return data[/FONT][/SIZE][/INDENT]
Tạo instance của class là sdwanp và truyền các tham số SDWAN_IP, SDWAN_USERNAME, SDWAN_PASSWORD
Code:
[INDENT][SIZE=14px][FONT=Times New Roman]sdwanp = rest_api_lib(SDWAN_IP, SDWAN_USERNAME, SDWAN_PASSWORD)[/FONT][/SIZE][/INDENT]
Code:
[INDENT][SIZE=14px][FONT=Times New Roman]@click.group()
def cli():[/FONT][/SIZE][/INDENT][INDENT=2][SIZE=14px][FONT=Times New Roman]pass[/FONT][/SIZE][/INDENT]
Code:
[INDENT][SIZE=14px][FONT=Times New Roman]@click.command()[/FONT][/SIZE][/INDENT][INDENT=2][SIZE=14px][FONT=Times New Roman]def device_list():[/FONT][/SIZE][/INDENT][INDENT=3][SIZE=14px][FONT=Times New Roman]"""Retrieve and return network devices list."""
click.echo("Retrieving the devices.")

response = json.loads(sdwanp.get_request('device'))
items = response['data'][/FONT][/SIZE][/INDENT]
Code:
[INDENT=2][SIZE=14px][FONT=Times New Roman]headers = ["Host-Name", "Device Type", "Device ID", "System IP", "Site ID", "Version", "Device Model"]
table = list()

for item in items:[/FONT][/SIZE][/INDENT][INDENT=3][SIZE=14px][FONT=Times New Roman]tr = [item['host-name'], item['device-type'], item['uuid'], item['system-ip'], item['site-id'], item['version'], item['device-model']]
table.append(tr)[/FONT][/SIZE][/INDENT][INDENT=2][SIZE=14px][FONT=Times New Roman]try:[/FONT][/SIZE][/INDENT][INDENT=3][SIZE=14px][FONT=Times New Roman]click.echo(tabulate(table, headers, tablefmt="fancy_grid"))[/FONT][/SIZE][/INDENT][INDENT=2][SIZE=14px][FONT=Times New Roman]except UnicodeEncodeError:[/FONT][/SIZE][/INDENT][INDENT=3][SIZE=14px][FONT=Times New Roman]click.echo(tabulate(table, headers, tablefmt="grid"))[/FONT][/SIZE][/INDENT]
Code:
[INDENT][SIZE=14px][FONT=Times New Roman]cli.add_command(device_list)[/FONT][/SIZE][/INDENT][INDENT=2][SIZE=14px][FONT=Times New Roman]if __name__ == "__main__": [/FONT][/SIZE][/INDENT][INDENT=3][SIZE=14px][FONT=Times New Roman]cli()[/FONT][/SIZE][/INDENT]

Kết quả:
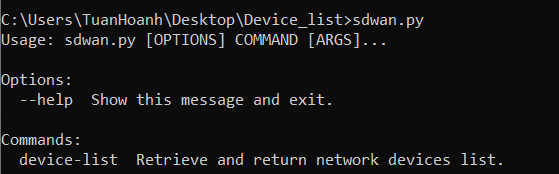
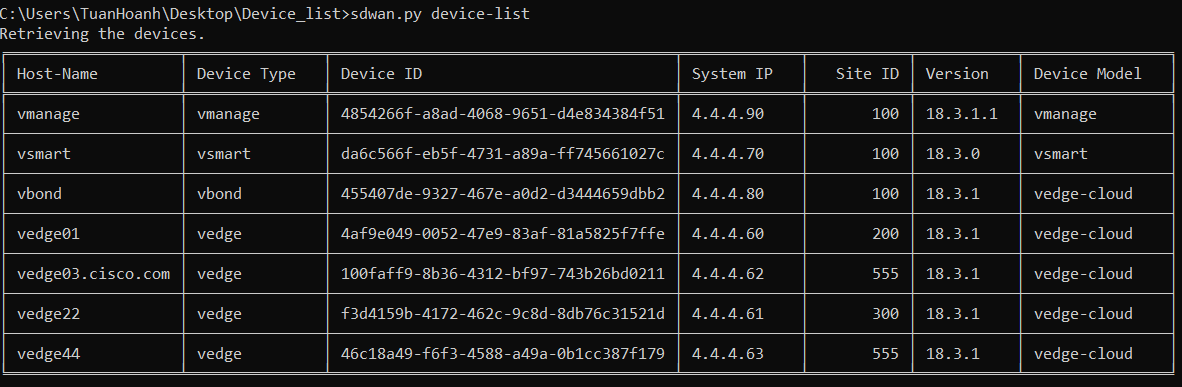
Để ý phần Usage có hướng dẫn cách sử dụng click, hiện tại commands hiện có là device-list nên trong cmd chúng ta sẽ gõ: >sdwan.py device-list
Kết quả là chúng ta lấy được danh sách các thiết bị hiện có trong mạng fabric SD-WAN.