 Tweet
Tweet
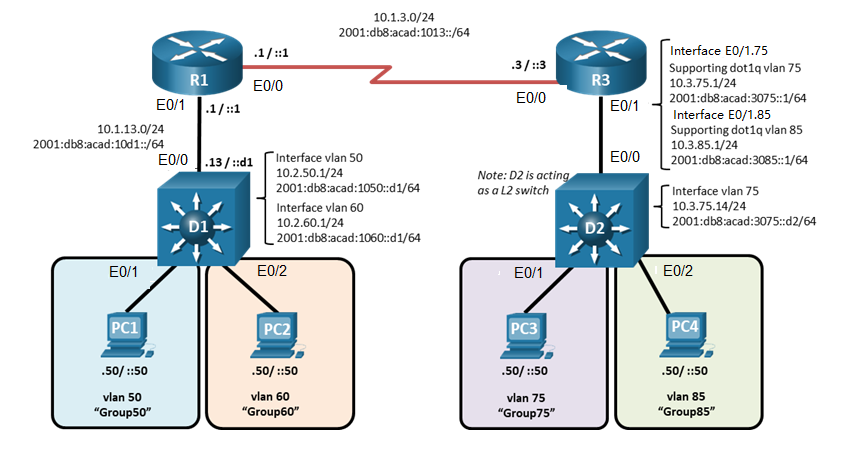
SƠ ĐỒ
BẢNG PHÂN HOẠCH IP
| Device | Interface | IPv4 Address | IPv6 Address | IPv6 Link-Local |
| R1 | E0/1 | 10.1.13.1/24 | 2001:db8:acad:10d1::1/64 | fe80::1:1 |
| R1 | E0/0 | 10.1.3.1/24 | 2001:db8:acad:1013::1/64 | fe80::1:2 |
| D1 | E0/0 | 10.1.13.13/24 | 2001:db8:acad:10d1::d1/64 | fe80::d1:1 |
| D1 | VLAN50 | 10.2.50.1/24 | 2001:db8:acad:1050::d1/64 | fe80::d1:2 |
| D1 | VLAN60 | 10.2.60.1/24 | 2001:db8:acad:1060::d1/64 | fe80::d1:3 |
| R3 | E0/0 | 10.1.3.3/24 | 2001:db8:acad:1013::3/64 | fe80::3:1 |
| R3 | E0/1.75 | 10.3.75.1/24 | 2001:db8:acad:3075::1/64 | fe80::3:2 |
| R3 | E0/1.85 | 10.3.85.1/24 | 2001:db8:acad:3085::1/64 | fe80::3:3 |
| D2 | VLAN75 | 10.3.75.14/24 | 2001:db8:acad:3075::d2/64 | fe80::d2:1 |
| PC1 | NIC | 10.2.50.50/24 | 2001:db8:acad:1050::50/64 | EUI-64 |
| PC2 | NIC | 10.2.60.50/24 | 2001:db8:acad:1060::50/64 | EUI-64 |
| PC3 | NIC | 10.3.75.50/24 | 2001:db8:acad:3075::50/64 | EUI-64 |
| PC4 | NIC | 10.3.85.50/24 | 2001:db8:acad:3085::50/64 | EUI-64 |

Phần 1. Kết nối thiết bị và cấu hình cơ bản
Phần 2. Cấu hình và kiểm tra Inter-VLAN Routing trên Switch Layer 3
Phần 3. Cấu hình và kiểm tra Inter-VLAN Routing trên Router
Phần 4. Kiểm tra bảng CAM và bảng CEF
THỰC HIỆN CẤU HÌNH
Phần 1: Kết nối thiết bị và cấu hình cơ bản
1.1. Kết nối thiết bị như hình
1.2. Cấu hình cơ bản
R1
Code:
Router#conf t
Router(config)#no ip domain lookup
Router(config)#hostname R1
R1(config)#line con 0
R1(config-line)# exec-timeout 0 0
R1(config-line)# logging synchronous
R1(config-line)# exit
R1(config)#banner motd # This is R1, Inter-VLAN Routing Lab #[B][/B]
R3
Code:
Router#conf t
Router(config)#
Router(config)#
Router(config)#no ip domain lookup
Router(config)#hostname R3
R3(config)#line con 0
R3(config-line)# exec-timeout 0 0
R3(config-line)# logging synchronous
R3(config-line)# exit
R3(config)#banner motd # This is R3, Inter-VLAN Routing Lab #
Code:
Switch#conf t
Switch(config)#no ip domain lookup
Switch(config)#hostname D1
D1(config)#line con 0
D1(config-line)# exec-timeout 0 0
D1(config-line)# logging synchronous
D1(config-line)# exit
D1(config)#banner motd # This is D1, Inter-VLAN Routing Lab #
D1(config)#interface range E0/0-3
D1(config-if-range)# shutdown[B][/B]
D2
Code:
Switch#conf t
Switch(config)#no ip domain lookup
Switch(config)#hostname D2
D2(config)#line con 0
D2(config-line)# exec-timeout 0 0
D2(config-line)# logging synchronous
D2(config-line)# exit
D2(config)#banner motd # This is D2, Inter-VLAN Routing Lab #
D2(config)#interface range E0/0-3
D2(config-if-range)# shutdown[B][/B]
Phần 2. Cấu hình và kiểm tra Inter-VLAN Routing trên Switch Layer 3
2.1. Cấu hình Inter-VLAN routing trên D1
a. Bật tính năng IP routing và IPv6 unicast-routing
Code:
[FONT=Courier New]D1(config)# [B]ip routing[/B][/FONT]
[FONT=Courier New]D1(config)# [B]ipv6 unicast-routing[/B][/FONT]
Code:
[FONT=Courier New]D1(config)# [B]vlan 50[/B][/FONT]
[FONT=Courier New]D1(config-vlan)# [B]name Group50[/B][/FONT]
[FONT=Courier New]D1(config-vlan)# [B]exit[/B][/FONT]
[FONT=Courier New]D1(config)# [B]vlan 60[/B][/FONT]
[FONT=Courier New]D1(config-vlan)# [B]name Group60[/B][/FONT]
[FONT=Courier New]D1(config-vlan)# [B]exit[/B][/FONT]
Code:
[FONT=Courier New]D1(config)# [B]interface E0/1[/B][/FONT]
[FONT=Courier New]D1(config-if)# [B]switchport mode access[/B][/FONT]
[FONT=Courier New]D1(config-if)# [B]switchport access vlan 50[/B][/FONT]
[FONT=Courier New]D1(config-if)# [B]no shutdown[/B][/FONT]
[FONT=Courier New]D1(config-if)# [B]exit[/B][/FONT]
[FONT=Courier New]D1(config)# [B]interface E0/2[/B][/FONT]
[FONT=Courier New]D1(config-if)# [B]switchport mode access[/B][/FONT]
[FONT=Courier New]D1(config-if)# [B]switchport access vlan 60[/B][/FONT]
[FONT=Courier New]D1(config-if)# [B]no shutdown[/B][/FONT]
[FONT=Courier New]D1(config-if)# [B]exit[/B][/FONT]
Code:
[FONT=Courier New]D1(config)# [B]interface vlan 50[/B][/FONT]
[FONT=Courier New]D1(config-if)# [B]ip address 10.2.50.1 255.255.255.0[/B][/FONT]
[FONT=Courier New]D1(config-if)# [B]ipv6 address fe80::d1:2 link-local[/B][/FONT]
[FONT=Courier New]D1(config-if)# [B]ipv6 address 2001:db8:acad:1050::d1/64[/B][/FONT]
[FONT=Courier New]D1(config-if)# [B]no shutdown[/B][/FONT]
[FONT=Courier New]D1(config-if)# [B]exit[/B][/FONT]
[FONT=Courier New]D1(config)# [B]interface vlan 60[/B][/FONT]
[FONT=Courier New]D1(config-if)# [B]ip address 10.2.60.1 255.255.255.0[/B][/FONT]
[FONT=Courier New]D1(config-if)# [B]ipv6 address fe80::d1:3 link-local[/B][/FONT]
[FONT=Courier New]D1(config-if)# [B]ipv6 address 2001:db8:acad:1060::d1/64[/B][/FONT]
[FONT=Courier New]D1(config-if)# [B]no shutdown[/B][/FONT]
[FONT=Courier New]D1(config-if)# [B]exit[/B][/FONT]
e. Test: Đặt IP cho PC1: 10.2.50.50/24 GW 10.2.50.1 và PC2: 10.2.60.50/24 GW 10.2.60.1. Sau đó ping từ PC1 sang PC2 lần lượt bằng IPv4 và IPv6
2.2. Cấu hình routed port và default route từ D1 tới R1
a. Cấu hình routed port
Code:
[FONT=Courier New]D1(config)# [B]interface E0/0[/B][/FONT]
[FONT=Courier New]D1(config-if)# [B]no switchport[/B][/FONT]
[FONT=Courier New]D1(config-if)# [B]ip address 10.1.13.13 255.255.255.0[/B][/FONT]
[FONT=Courier New]D1(config-if)# [B]ipv6 address fe80::d1:1 link-local[/B][/FONT]
[FONT=Courier New]D1(config-if)# [B]ipv6 address 2001:db8:acad:10d1::d1/64[/B][/FONT]
[FONT=Courier New]D1(config-if)# [B]no shutdown[/B][/FONT]
[FONT=Courier New]D1(config-if)# [B]exit[/B][/FONT]
b. Cấu hình default route tới R1
Code:
[FONT=Courier New]D1(config)# [B]ip route 0.0.0.0 0.0.0.0 10.1.13.1[/B][/FONT]
[FONT=Courier New]D1(config)# [B]ipv6 route ::/0 2001:db8:acad:10d1::1[/B][/FONT]
a. Bật tính năng IPv6 unicast-routing
Code:
[FONT=Courier New]R1(config)# [B]ipv6 unicast-routing[/B][/FONT]
Code:
[FONT=Courier New]R1(config)# [B]interface E0/1[/B][/FONT]
[FONT=Courier New]R1(config-if)# [B]ip address 10.1.13.1 255.255.255.0[/B][/FONT]
[FONT=Courier New]R1(config-if)# [B]ipv6 address fe80::1:1 link-local[/B][/FONT]
[FONT=Courier New]R1(config-if)# [B]ipv6 address 2001:db8:acad:10d1::1/64[/B][/FONT]
[FONT=Courier New]R1(config-if)# [B]no shutdown[/B][/FONT]
[FONT=Courier New]R1(config-if)# [B]exit[/B][/FONT]
[FONT=Courier New]R1(config)# [B]interface E0/0[/B][/FONT]
[FONT=Courier New]R1(config-if)# [B]ip address 10.1.3.1 255.255.255.0[/B][/FONT]
[FONT=Courier New]R1(config-if)# [B]ipv6 address fe80::1:2 link-local[/B][/FONT]
[FONT=Courier New]R1(config-if)# [B]ipv6 address 2001:db8:acad:1013::1/64[/B][/FONT]
[FONT=Courier New]R1(config-if)# [B]no shutdown[/B][/FONT]
[FONT=Courier New]R1(config-if)# [B]exit[/B][/FONT]
c. Cấu hình static route đến các lớp mạng bên kia D1 và default route về R3
Code:
[FONT=Courier New]R1(config)# [B]ip route 10.2.0.0 255.255.0.0 10.1.13.13[/B][/FONT]
[FONT=Courier New]R1(config)# [B]ipv6 route 2001:db8:acad:1050::/64 2001:db8:acad:10d1::d1[/B][/FONT]
[FONT=Courier New]R1(config)# [B]ipv6 route 2001:db8:acad:1060::/64 2001:db8:acad:10d1::d1[/B][/FONT]
[FONT=Courier New]R1(config)#[/FONT]
[FONT=Courier New]R1(config)# [B]ip route 0.0.0.0 0.0.0.0 10.1.3.3[/B][/FONT]
[FONT=Courier New]R1(config)# [B]ipv6 route ::/0 2001:db8:acad:1013::3[/B][/FONT]
3.1. Cấu hình VLAN cho Swich D2
a. Tạo VLAN 75, 85 và native VLAN 999
Code:
[FONT=Courier New]D2(config)# [B]vlan 75[/B][/FONT]
[FONT=Courier New]D2(config-vlan)# [B]name Group75[/B][/FONT]
[FONT=Courier New]D2(config-vlan)# [B]exit[/B][/FONT]
[FONT=Courier New]D2(config)# [B]vlan 85[/B][/FONT]
[FONT=Courier New]D2(config-vlan)# [B]name Group85[/B][/FONT]
[FONT=Courier New]D2(config-vlan)# [B]exit[/B][/FONT]
[FONT=Courier New]D2(config)# [B]vlan 999[/B][/FONT]
[FONT=Courier New]D2(config-vlan)# [B]name NativeVLAN[/B][/FONT]
[FONT=Courier New]D2(config-vlan)# [B]exit[/B][/FONT]
Code:
[FONT=Courier New]D2(config)# [B]interface E0/1[/B][/FONT]
[FONT=Courier New]D2(config-if)# [B]switchport mode access[/B][/FONT]
[FONT=Courier New]D2(config-if)# [B]switchport access vlan 75[/B][/FONT]
[FONT=Courier New]D2(config-if)# [B]no shutdown[/B][/FONT]
[FONT=Courier New]D2(config-if)# [B]exit[/B][/FONT]
[FONT=Courier New]D2(config)# [B]interface E0/2[/B][/FONT]
[FONT=Courier New]D2(config-if)# [B]switchport mode access[/B][/FONT]
[FONT=Courier New]D2(config-if)# [B]switchport access vlan 85[/B][/FONT]
[FONT=Courier New]D2(config-if)# [B]no shutdown[/B][/FONT]
[FONT=Courier New]D2(config-if)# [B]exit[/B][/FONT]
Code:
[FONT=Courier New]D2(config)# [B]interface vlan75[/B][/FONT]
[FONT=Courier New]D2(config-if)# [B]ip address 10.3.75.14 255.255.255.0[/B][/FONT]
[FONT=Courier New]D2(config-if)# [B]ipv6 address fe80::d2:1 link-local[/B][/FONT]
[FONT=Courier New]D2(config-if)# [B]ipv6 address 2001:db8:acad:3075::d2/64[/B][/FONT]
[FONT=Courier New]D2(config-if)# [B]no shutdown[/B][/FONT]
[FONT=Courier New]D2(config-if)# [B]exit[/B][/FONT]
Code:
[FONT=Courier New]D2(config)# [B]interface g1/0/11[/B][/FONT]
[FONT=Courier New]D2(config-if)# [B]switchport mode trunk[/B][/FONT]
[FONT=Courier New]D2(config-if)# [B]switchport trunk native vlan 999[/B][/FONT]
[FONT=Courier New]D2(config-if)# [B]switchport trunk allowed vlan 75,85,999[/B][/FONT]
[FONT=Courier New]D2(config-if)# [B]no shutdown[/B][/FONT]
[FONT=Courier New]D2(config-if)# [B]exi[/B][B]t[/B][/FONT]
a. Cấu hình subinterface tương ứng với 3 VLAN vừa tạo
Code:
[FONT=Courier New]R3(config)# [B]interface E0/1[/B][/FONT]
[FONT=Courier New]R3(config-if)# [B]no shutdown[/B][/FONT]
[FONT=Courier New]R3(config-if)# [B]exit[/B][/FONT]
[FONT=Courier New]R3(config)# [B]interface E0/1.75[/B][/FONT]
[FONT=Courier New]R3(config-subif)# [B]encapsulation dot1q 75[/B][/FONT]
[FONT=Courier New]R3(config-subif)# [B]ip address 10.3.75.1 255.255.255.0[/B][/FONT]
[FONT=Courier New]R3(config-subif)# [B]ipv6 address fe80::3:2 link-local[/B][/FONT]
[FONT=Courier New]R3(config-subif)# [B]ipv6 address 2001:db8:acad:3075::1/64[/B][/FONT]
[FONT=Courier New]R3(config-subif)# [B]no shutdown[/B][/FONT]
[FONT=Courier New]R3(config-subif)# [B]exit[/B][/FONT]
[FONT=Courier New]R3(config)# [B]interface E0/1.85[/B][/FONT]
[FONT=Courier New]R3(config-subif)# [B]encapsulation dot1q 85[/B][/FONT]
[FONT=Courier New]R3(config-subif)# [B]ip address 10.3.85.1 255.255.255.0[/B][/FONT]
[FONT=Courier New]R3(config-subif)# [B]ipv6 address fe80::3:3 link-local[/B][/FONT]
[FONT=Courier New]R3(config-subif)# [B]ipv6 address 2001:db8:acad:3085::1/64[/B][/FONT]
[FONT=Courier New]R3(config-subif)# [B]no shutdown[/B][/FONT]
[FONT=Courier New]R3(config-subif)# [B]exit[/B][/FONT]
[FONT=Courier New]R3(config)# [B]interface E0/1.999[/B][/FONT]
[FONT=Courier New]R3(config-subif)# [B]encapsulation dot1q 999 native[/B][/FONT]
[FONT=Courier New]R3(config-subif)# [B]no shutdown[/B][/FONT]
[FONT=Courier New]R3(config-subif)# [B]exit[/B][/FONT]
3.3. Cấu hình static route trên R3
a. Đặt IP cho cổng E0/0
Code:
[FONT=Courier New]R3(config)# [B]interface E0/0[/B][/FONT]
[FONT=Courier New]R3(config-if)# [B]ip address 10.1.3.3 255.255.255.0[/B][/FONT]
[FONT=Courier New]R3(config-if)# [B]ipv6 address fe80::3:1 link-local[/B][/FONT]
[FONT=Courier New]R3(config-if)# [B]ipv6 address 2001:db8:acad:1013::3/64[/B][/FONT]
[FONT=Courier New]R3(config-if)# [B]no shutdown[/B][/FONT]
[FONT=Courier New]R3(config-if)# [B]exit[/B][/FONT][B][/B]
b. Cấu hình default route IPv4 và IPv6
Code:
R3(config)# [B]ip route 0.0.0.0 0.0.0.0 10.1.3.1[/B]
Code:
[FONT=Courier New]R3(config)# [B]ipv6 route ::/0 2001:db8:acad:1013::1[/B][B][/B][/FONT]
c. Test Ping từ PC3 sang PC 2
Phần 4. Kiểm tra bảng CAM và bảng CEF
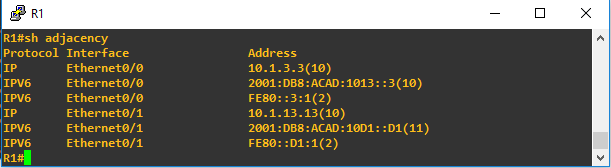
Phần 4, chúng ta sẽ tìm hiểu về CEF trên thiết bị ta đã cấu hình. Mục đích của CEF (Cisco Express Forwarding) là tăng tốc xử lý gói tin đi ra khỏi router từ 1 interface. Dữ liệu sẽ được biên tập trong 2 bảng là bảng Forwarding Information Base (FIB) và bảng Adjacency. Nó định nghĩa ngắn gọn gói tin với địa chỉ đích đó thì cần đưa ra cổng nào tương ứng nào.
Ví dụ, với đích đến là 10.2.0.0/16 thì next hop là địa chỉ 10.1.13.13 tồn tại trên cổng E0/1. Vậy chỉ cần đẩy ra cổng E0/1 sẽ đi đến được next hop.
Bảng FIB
Bảng Adjacency
Tác giả,
Võ Văn Kết
Network Engineer -- VnPro's Instructor.
Comment