
 Tweet
Tweet
3.1 Đăng ký IP Phone với CME ở BR1 theo sơ đồ hình vẽ. Hãy đặt tên theo dạng SC Phone1. Hãy đảm bảo là thời gian được hiển thị ở dạng dd/mm/yy. Tất cả các traffic đều dùng interface vlan của voice:
Đầu tiên trên Router CME thực hiện đặt IP và định tuyến VLAN (đã hoàn thành ở yêu cầu ban đầu)
Tiếp theo CME tạo pool DHCP cấp IP cho các IP Phone kèm theo option 150 trỏ tới TFTP trên chính CME
CME
Tiếp theo cấu hình dịch vụ telephony-service dành cho IP Phone theo SCCP hoặc cấu hình voice register global cho IP Phone theo SIP trên CME
SCCP
SIP
3.2 Hãy cấu hình luồng E1 trên router CME này. Nhà cung cấp dịch vụ sẽ gửi ra 9 số trên các cuộc gọi inbound. Hãy đảm bảo các cuộc gọi ra cũng thành công bằng cách gọi 113. Dịch vụ caller ID cũng phải enabled
Trên Router PSTN cấu hình cấp luồng E1 về phía Router CME BR1 (đã cấu hình ở yêu cầu 1), phía CME BR1 cũng cấu hình đường E1 đón số từ PSTN cấp về, sau đó cấu hình dial-peer để gọi ra 113
3.3 Người dùng ở chi nhánh 2 phải có thể gọi quốc tế bằng cách quay số 9, theo sau bởi 00, theo sau bởi bất kỳ dãy số nào. Các số calling/called phải được gán kiểu là International. Các số calling/called number hiển thị ở dạng E.164.
3.4 Người dùng ở chi nhánh 2 phải có thể gọi người dùng ở HQ và SB thông qua HQ_CUBE.
Phối hợp với yêu cầu 2.6, từ Router CME BR1 tạo 1 SIP đến R1, tạo các Dial-peer gửi cuộc gọi đến địa chỉ của R1
4.1 Người dùng ở Branch sẽ tích hợp với CUC dùng SIP. Số điện thoại voicemail pilot sẽ là 2220. Hãy đảm bảo rằng VM pilot có thể gọi được từ bất kỳ phone nào, bao gồm cả PSTN và nghe được lời chào của CUC.
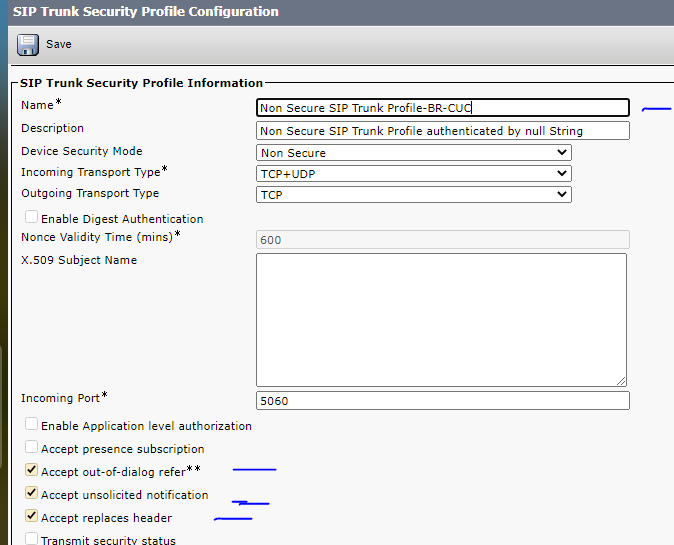
Đầu tiên tạo 1 SIP Trunk Security Profile để gán các cài đặt kết nối với CUC
Vào System -> Security -> SIP Trunk Security Profile, chọn Find sau đó chọn Non Secure SIP Trunk Profile. Bấm nút Copy để tạo ra 1 Profile dựa trên Non Secure SIP Trunk Profile. Thay đổi tên của Profile, sau đó tick chọn vào Accept out-of-dialog refer, Accept unsolicited notification và Accept replaces header
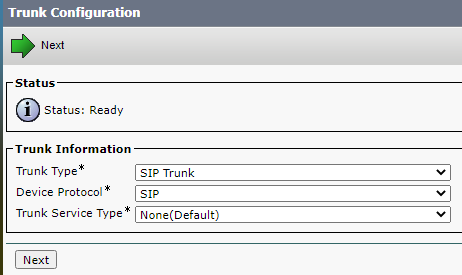
Sau đó tạo 1 SIP Trunk: vào Device -> Trunk, chọn Add New, chọn Trunk Type, Device Protocol sau đó chọn Next
Khai báo Device Name và device pool
[img]https://2.pik.vn/20207d90ab27-9228-4a50-a100-efacd10bde66.png[/img005D
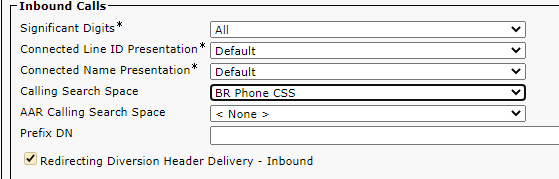
Kéo xuống mục Inbound Calls chọn Calling Search Space và tick chọn vào Redirecting Diversion Header Delivery – Inbound
Kéo xuống mục Outbound Calls tick chọn vào Redirecting Diversion Header Delivery –Outbound
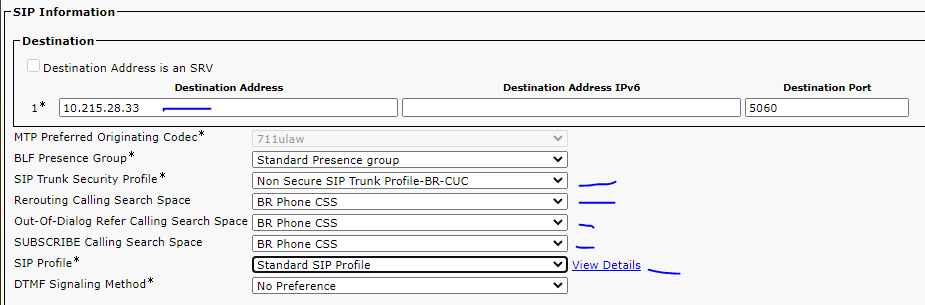
Kéo xuống mục SIP Information điền thông tin IP của CUC Server vào, chọn SIP Trunk Security Profile đã tạo ở trên, chọn các CSS, chọn SIP Profile sau đó chọn Save sau đó chọn Reset để áp cấu hình.
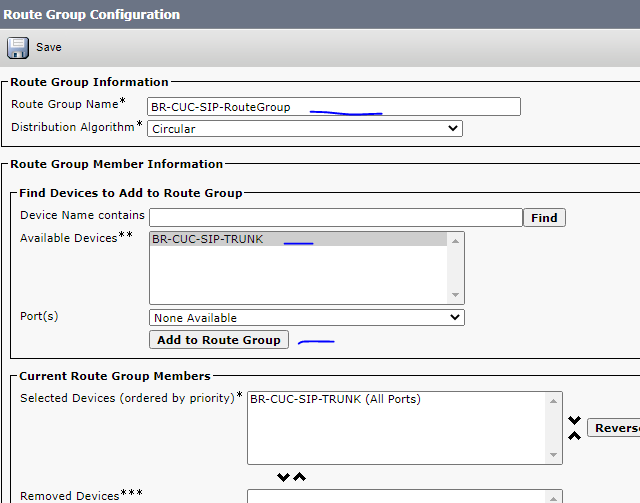
Tiếp theo thì tạo Route Group và Route List. Vào Call Routing -> Route/Hunt -> Route Group, chọn Add New, đặt tên cho Route Group, chọn đường SIP Trunk đã tạo và bấm Add to Route Group sau đó chọn Save
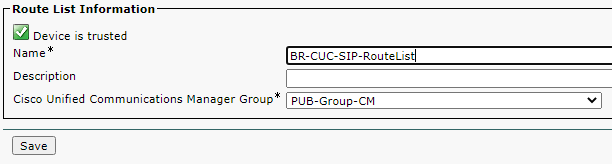
Để tạo Route List vào Call Routing -> Route/Hunt -> Route List, chọn Add New. Điền tên và chọn Group CUCM sau đó chọn Save
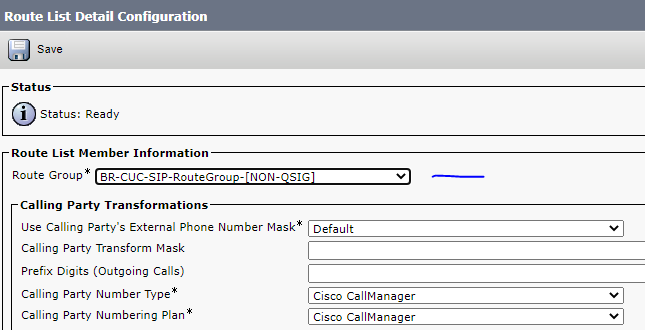
Một giao diện mới xuất hiện, chọn nút Add Route Group và chọn Route Group vừa tạo sau đó chọn Save và chọn Reset
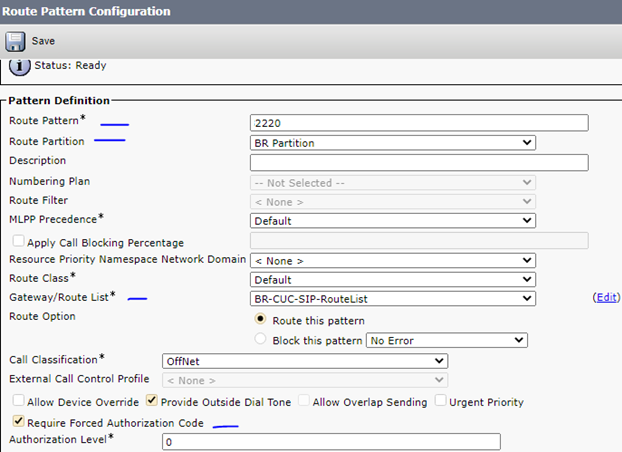
Tiếp theo tạo Route Pattern: Vào Call Routing -> Route/Hunt-> Route Pattern, chọn Add New, điền số Pilot number, chọn Partition và Route List, tick chọn Require Forced Authorization Code sau đó chọn Save
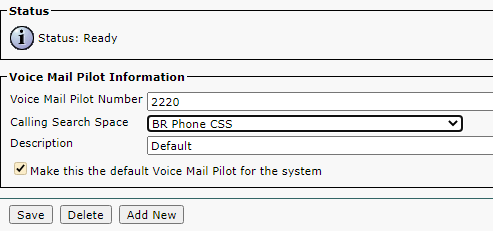
Sau đó vào Advanced Features -> Voice Mail -> Voice Mail Pilot. Chọn Find sau đó chọn Voicemail Default. Chỉnh lại số Pilot number, chọn CSS, Tick chọn Make this the default Voice Mail Pilot for the system sau đó chọn Save
Sau đó cần cấu hình trên CUC Server có thể sử dụngSIP Connection kết nối tới CUCM.
Thực hiện đăng nhập vào CUC chọn Telephony Integrations -> Phone System, chọn Find sau đó chọn PhoneSystem, chỉnh sửa tên PhoneSystem mặc định để tạo mới dành cho Voice Mail ở BR sau đó chọn Save. Phone System mới có tên BR Voicemail
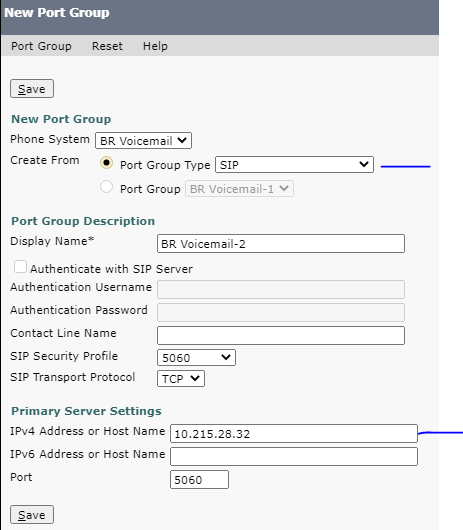
Sau đó chọn Add Port Group ở góc trên bên phải và chọn Go

Thay đổi port group type thành SIP, mục Primary Server Setting khai báo địa chỉ của BR PUB và chọn Save
Sau đó chọn Add Port ở góc trên bên phải và chọn Go
Điền số Port tuỳ ý vào và chọn Save
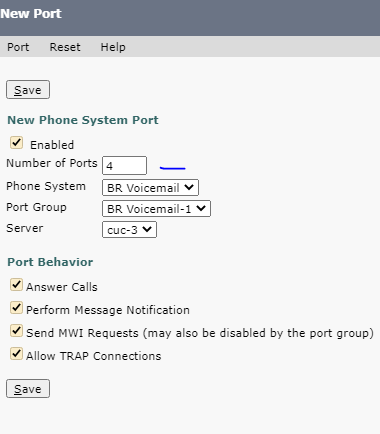
4 ở đây là hỗ trợ 4 cuộc gọi. Sau đó có thể kiểm tra bằng cách bấm nút Message trên IP Phone tại BR có thể nghe được lời chào từ Voice Mail
Đầu tiên trên Router CME thực hiện đặt IP và định tuyến VLAN (đã hoàn thành ở yêu cầu ban đầu)
Tiếp theo CME tạo pool DHCP cấp IP cho các IP Phone kèm theo option 150 trỏ tới TFTP trên chính CME
CME
Code:
[FONT=Courier New]ip dhcp pool voice100[/FONT]
[FONT=Courier New]  network 10.1.100.0 255.255.255.0[/FONT]
[FONT=Courier New]  default-router 10.1.100.1[/FONT]
[FONT=Courier New]  option 150 ip 10.1.100.1[/FONT]
[FONT=Courier New]  exit[/FONT]
[FONT=Courier New]ip dhcp exclude-address 10.1.100.1[/FONT]
SCCP
Code:
[FONT=Courier New]telephony-service[/FONT]
[FONT=Courier New]  ip source-address 10.1.100.1 port 2000[/FONT]
[FONT=Courier New]  max-dn 144[/FONT]
[FONT=Courier New]  max-ephones 42[/FONT]
[FONT=Courier New]  create cnf-files[/FONT]
[FONT=Courier New]  time-zone 12[/FONT]
[FONT=Courier New]  date-format dd-mm-yy[/FONT]
[FONT=Courier New]  no auto-reg-phone[/FONT]
[FONT=Courier New]  exit[/FONT]
[FONT=Courier New]ephone-dn 1[/FONT]
[FONT=Courier New]  description SC Phone1[/FONT]
[FONT=Courier New]  number 1355 secondary 02873001355[/FONT]
[FONT=Courier New]  exit[/FONT]
[FONT=Courier New]ephone-dn 2[/FONT]
[FONT=Courier New]  description SC Phone2[/FONT]
[FONT=Courier New]  number 1356 secondary 02873001356[/FONT]
[FONT=Courier New]  exit[/FONT]
[FONT=Courier New]ephone 1[/FONT]
[FONT=Courier New]  mac-address xxxx.xxxx.xxxx[/FONT]
[FONT=Courier New]  type 7960[/FONT]
[FONT=Courier New]  button 1:1[/FONT]
[FONT=Courier New]  code g711u1aw[/FONT]
[FONT=Courier New]  restart[/FONT]
[FONT=Courier New]  exit[/FONT]
[FONT=Courier New]ephone 2[/FONT]
[FONT=Courier New]  mac-address yyyy.yyyy.yyyy[/FONT]
[FONT=Courier New]  type 7960[/FONT]
[FONT=Courier New]  button 1:2[/FONT]
[FONT=Courier New]  code g711u1aw[/FONT]
[FONT=Courier New]  restart[/FONT]
[FONT=Courier New]  exit[/FONT]
Code:
[FONT=Courier New]voice service voip[/FONT]
[FONT=Courier New] ip address trusted list[/FONT]
[FONT=Courier New]   ipv4 10.0.100.0 255.255.255.0[/FONT]
[FONT=Courier New] allow-connections h323 to h323[/FONT]
[FONT=Courier New] allow-connections h323 to sip[/FONT]
[FONT=Courier New] allow-connections sip to h323[/FONT]
[FONT=Courier New] allow-connections sip to sip[/FONT]
[FONT=Courier New] sip[/FONT]
[FONT=Courier New]   registrar server expires max 600 min 60[/FONT]
[FONT=Courier New]   bind control source-interface f0/0.100[/FONT]
[FONT=Courier New]   bind media source-interface f0/0.100[/FONT]
[FONT=Courier New]   registrar server[/FONT]
[FONT=Courier New]   exit[/FONT]
[FONT=Courier New] exit[/FONT]
[FONT=Courier New]voice register global[/FONT]
[FONT=Courier New] mode cme[/FONT]
[FONT=Courier New] source-address 10.0.100.1 port 5060[/FONT]
[FONT=Courier New] max-dn 10[/FONT]
[FONT=Courier New] max-pool 10[/FONT]
[FONT=Courier New] load 9971 sip9971.9-1-1SR1.loads[/FONT]
[FONT=Courier New] authenticate register[/FONT]
[FONT=Courier New] time-format 24[/FONT]
[FONT=Courier New] date-format D/M/Y[/FONT]
[FONT=Courier New] tftp-path flash:[/FONT]
[FONT=Courier New] create profile[/FONT]
[FONT=Courier New] camera[/FONT]
[FONT=Courier New] video[/FONT]
[FONT=Courier New] exit[/FONT]
[FONT=Courier New]voice register dn  1[/FONT]
[FONT=Courier New] number 1355[/FONT]
[FONT=Courier New] name SC Phone 1[/FONT]
[FONT=Courier New] label SC Phone 1[/FONT]
[FONT=Courier New] exit[/FONT]
[FONT=Courier New]voice register dn  2[/FONT]
[FONT=Courier New] number 02873001355[/FONT]
[FONT=Courier New] name SC Phone 1[/FONT]
[FONT=Courier New] label SC Phone 1[/FONT]
[FONT=Courier New] exit[/FONT]
[FONT=Courier New]voice register pool  1[/FONT]
[FONT=Courier New] busy-trigger-per-button 1[/FONT]
[FONT=Courier New] id mac XXXX.XXXX.XXXX[/FONT]
[FONT=Courier New] session-transport tcp[/FONT]
[FONT=Courier New] type 9971[/FONT]
[FONT=Courier New] number 1 dn 1[/FONT]
[FONT=Courier New] number 2 dn 2[/FONT]
[FONT=Courier New] presence call-list[/FONT]
[FONT=Courier New] dtmf-relay rtp-nte sip-notify[/FONT]
[FONT=Courier New] username admin password vnpro[/FONT]
Trên Router PSTN cấu hình cấp luồng E1 về phía Router CME BR1 (đã cấu hình ở yêu cầu 1), phía CME BR1 cũng cấu hình đường E1 đón số từ PSTN cấp về, sau đó cấu hình dial-peer để gọi ra 113
Code:
[FONT=Courier New]dial-peer voice 113 pots[/FONT]
[FONT=Courier New]destination-pattern 113$[/FONT]
[FONT=Courier New]port 0/2/0:15[/FONT]
[FONT=Courier New]forward-digits 3[/FONT]
Code:
[FONT=Courier New]voice translation-rule 900[/FONT]
[FONT=Courier New]rule 1 /^13../ /+84287300\0/ type any international plan any isdn[/FONT]
[FONT=Courier New]exit[/FONT]
[FONT=Courier New]voice translation-rule 9000[/FONT]
[FONT=Courier New]rule 1 /^900\(.*\)/ /\1/ type any international plan any isdn[/FONT]
[FONT=Courier New]exit[/FONT]
[FONT=Courier New]voice translation-profile TRANSLATE-INTL-OUTBOUND[/FONT]
[FONT=Courier New]translate calling 900[/FONT]
[FONT=Courier New]translate called 9000[/FONT]
[FONT=Courier New]exit[/FONT]
[FONT=Courier New]dial-peer voice 900 pots[/FONT]
[FONT=Courier New]translation-profile outgoing TRANSLATE-INTL-OUTBOUND[/FONT]
[FONT=Courier New]destination-pattern 900T[/FONT]
[FONT=Courier New]port 0/2/0:15[/FONT]
[FONT=Courier New]forward-digits all[/FONT]
Phối hợp với yêu cầu 2.6, từ Router CME BR1 tạo 1 SIP đến R1, tạo các Dial-peer gửi cuộc gọi đến địa chỉ của R1
Code:
[FONT=Courier New]voice service voip[/FONT]
[FONT=Courier New]  allow-connections sip to sip[/FONT]
[FONT=Courier New]  exit[/FONT]
[FONT=Courier New]dial-peer voice 1100[/FONT]
[FONT=Courier New]  destination-pattern 11..[/FONT]
[FONT=Courier New]  session protocol sipv2[/FONT]
[FONT=Courier New]  session target ipv4:10.1.20.1[/FONT]
[FONT=Courier New]  incoming called-number 13..[/FONT]
[FONT=Courier New]  exit[/FONT]
[FONT=Courier New]dial-peer voice 1200[/FONT]
[FONT=Courier New]  destination-pattern 12..[/FONT]
[FONT=Courier New]  session protocol sipv2[/FONT]
[FONT=Courier New]  session target ipv4:10.1.20.1[/FONT]
[FONT=Courier New]  incoming called-number 13..[/FONT]
[FONT=Courier New]  exit[/FONT]
Đầu tiên tạo 1 SIP Trunk Security Profile để gán các cài đặt kết nối với CUC
Vào System -> Security -> SIP Trunk Security Profile, chọn Find sau đó chọn Non Secure SIP Trunk Profile. Bấm nút Copy để tạo ra 1 Profile dựa trên Non Secure SIP Trunk Profile. Thay đổi tên của Profile, sau đó tick chọn vào Accept out-of-dialog refer, Accept unsolicited notification và Accept replaces header
Sau đó tạo 1 SIP Trunk: vào Device -> Trunk, chọn Add New, chọn Trunk Type, Device Protocol sau đó chọn Next
Khai báo Device Name và device pool
[img]https://2.pik.vn/20207d90ab27-9228-4a50-a100-efacd10bde66.png[/img005D
Kéo xuống mục Inbound Calls chọn Calling Search Space và tick chọn vào Redirecting Diversion Header Delivery – Inbound
Kéo xuống mục Outbound Calls tick chọn vào Redirecting Diversion Header Delivery –Outbound
Kéo xuống mục SIP Information điền thông tin IP của CUC Server vào, chọn SIP Trunk Security Profile đã tạo ở trên, chọn các CSS, chọn SIP Profile sau đó chọn Save sau đó chọn Reset để áp cấu hình.
Tiếp theo thì tạo Route Group và Route List. Vào Call Routing -> Route/Hunt -> Route Group, chọn Add New, đặt tên cho Route Group, chọn đường SIP Trunk đã tạo và bấm Add to Route Group sau đó chọn Save
Để tạo Route List vào Call Routing -> Route/Hunt -> Route List, chọn Add New. Điền tên và chọn Group CUCM sau đó chọn Save
Một giao diện mới xuất hiện, chọn nút Add Route Group và chọn Route Group vừa tạo sau đó chọn Save và chọn Reset
Tiếp theo tạo Route Pattern: Vào Call Routing -> Route/Hunt-> Route Pattern, chọn Add New, điền số Pilot number, chọn Partition và Route List, tick chọn Require Forced Authorization Code sau đó chọn Save
Sau đó vào Advanced Features -> Voice Mail -> Voice Mail Pilot. Chọn Find sau đó chọn Voicemail Default. Chỉnh lại số Pilot number, chọn CSS, Tick chọn Make this the default Voice Mail Pilot for the system sau đó chọn Save
Sau đó cần cấu hình trên CUC Server có thể sử dụngSIP Connection kết nối tới CUCM.
Thực hiện đăng nhập vào CUC chọn Telephony Integrations -> Phone System, chọn Find sau đó chọn PhoneSystem, chỉnh sửa tên PhoneSystem mặc định để tạo mới dành cho Voice Mail ở BR sau đó chọn Save. Phone System mới có tên BR Voicemail
Sau đó chọn Add Port Group ở góc trên bên phải và chọn Go
Thay đổi port group type thành SIP, mục Primary Server Setting khai báo địa chỉ của BR PUB và chọn Save
Sau đó chọn Add Port ở góc trên bên phải và chọn Go
Điền số Port tuỳ ý vào và chọn Save
4 ở đây là hỗ trợ 4 cuộc gọi. Sau đó có thể kiểm tra bằng cách bấm nút Message trên IP Phone tại BR có thể nghe được lời chào từ Voice Mail